OpenWRT and Raspberry PI Access Point

Today I decided to build one personal access point for my travels.

I had one Raspberry PI 2 in my drawers and I decided to use it.

I wanted to prepare something fancy based on web environment and not in bash.

Trying to see what exists compatible with raspberry pi I have found OpenWRT…

I tried to install it and everything work well until I tried to put the wireless cards working. 🙁

The wi-fi did not start-up, I could not make it work…
Until I found I had to install some packages…

I have installed the hostapd package
I have installed the hostapd-common
I have installed the hostapd-utils

This is required to transform the device into an access point.

To install this packages I used the web interface.
Menu System -> Software

Finally I discovered that the network drivers did not exist, I have installed the drivers for the wireless network cards…

1
opkg install kmod-rt2800-lib kmod-rt2800-usb kmod-rt2x00-lib kmod-rt2x00-usb

The suddenly I have a new menu and I can see wi-fi networks… 🙁

But I am not still able to connect or able to advertise my SSID… 🙁

I Hope to be able to complete this post very soon with all the required steps.

List all IP addresses range in a 16 bit network v1.0

Objective:

Pass some IP address as part of a command string to test reverse proxy vulnerability and scan the internal network behind the proxy. Running one already existing python script that receives this Ip as one possible dmz host to scan open tcp ports.

Exploit only accepts one DMZ ip as argument. Does not accept any range or array of IP addresses.

Requirements:

Script that provides me all possible IPs one per one in a network with 16 or more bits so the python exploit script can be called with the ip address as argument.

Missing:

The python script call from shell with the ip and argument for scanning the DMZ network.

Observation:
Script does nothing it only list all the ip address in a 16bit network starting from 192.168.0.0 until it reaches 192.168.255.255

Improvements:
Create multiple parallel requests as they are not dependent and will be faster if executed in parallel.

1
2
3
4
5
6
7
8
9
10
11
12
13
14
15
16
17
18
19
20
21
22
#!/bin/bash
 
############################################################################
# List all IPs in 16 Bit Network
############################################################################
 
let first_Octet=192
let second_Octet=168
let third_Octet=0
let fourth_Octet=0
 
while [ $third_Octet -lt 255 ]
do
		while [ $fourth_Octet -lt 255 ]
		do
			let fourth_Octet=$[$fourth_Octet+1]
			host=$first_Octet.$second_Octet.$third_Octet.$fourth_Octet
			echo $host
		done
		let third_Octet=$[$third_Octet+1]
		let fourth_Octet=0
done

INTRO TO BASH SHELL on MAC part 2

In the part 1 of this learning topic you had one introductory approach to BASH in this part we will go deeper in the knowledge of BASH in MAC OS

Now that we know how to open a terminal window in a MAC we will need to confirm that we are really running bash on that window.
For that it is required to execute a simple command.

The command bellow will check if we are running bash.

echo $BASH

Notice that if you do not use the capitals in “BASH” you will not get the return.

If your output is not “/bin/bash” then install and enable BASH in your machine.

Command Arguments

A command is a word that is written in the shell.

In the previous example the command is “echo”.

Everything that comes after the command is called argument.

In the previous example “$BASH” is the argument for the command echo.

Options

If an argument starts with a  ” – ” then it is considered an option.

Examples:

  • ls -a
  • ls -l
  • ls -la

In this example the command is “ls” that corresponds to list and the -a is the option that instructs ls command to list all the files including the ones that are hidden, -l is the option that instructs the command to list the files in long format.

Help

The commands might have several options available. To list those options or to know how to use the commands we can call the manual for that command.

For that we use the command “man” and then as argument the name of the command that we wish to receive help for.

This will open the manual page for the specified command.

Space key will move down a page, “b” will move back a page.

Search will be done with the “/” and exit with “q”

Test this new commands and pay attention to the differences in the output.

INTRO TO BASH SHELL on MAC – Part 1

Bash is a shell that exists on all Linux machines and in apple machines also.

You can’t not start it directly, or find any many with bash, to run bash you need to simply run a terminal emulator.

That terminal emulator runs bash inside it.

This video shows where you need to go to open a terminal window inside finder.

What you see when you opened it is what we call bash prompt.
The Prompt is where we can call the bash commands.
All commands should be followed by enter key. This enter key is what forces the machine to read my stings and execute them accordingly.
If the machine does not recognizes my strings as a command it will return an error of command not found.

The prompt can be 100% configurable.

The one that is listed on the video is reconfigured but all the basic is present there.

Lets take a look at the prompt.

In the video you will identify the following things in the command prompt:

  • The logged on user
  • The name of the machine where the user is logged on
  • The path where the user is
  • And the command line space.

For that we had to use several commands, the commands will be spoken a bit latter for now I just want to list them and give a introduction.

  • cd – stands for Change directory it is used to change from one directory to another.
  • pwd – stands for Print Working Directory and it is used to show us where we are.
  • ls – stands for list segments and it is used to list files and directories


And you can think of the current working directory as the location you are currently at.

Navigate a bit though your file system using the ” CD ” and ” CD .. ” and the other commands that were used on the video to see where you are, and list contents.

You will have different contents than me for sure.

Make yourself comfortable because this will be very useful for the future.

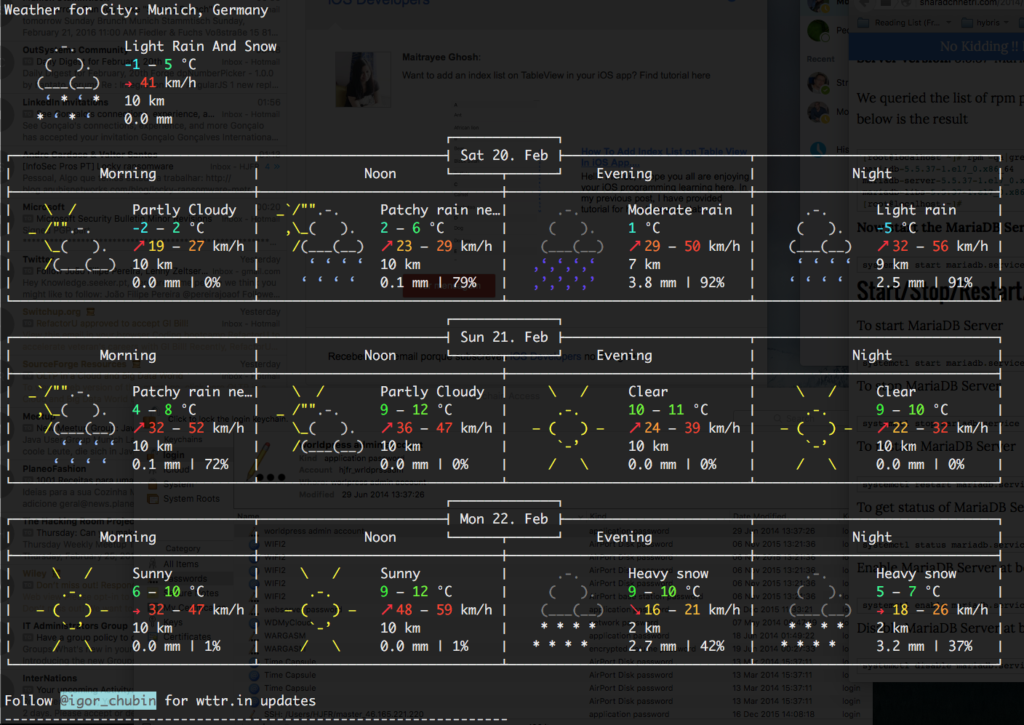
BASH Weather forecast…

Stumbled on this, and I had to share it… 🙂

If you are really a pro 😛 you need to get your weather forecast using BASH shell… 🙂

Just use this:

curl -4 http://wttr.in/Munich

You will have something like this…

Screen Shot 2016-02-20 at 13.05.23